Use openpyxl - read and write Cell in Python

Introduction
In previous article, “Use openpyxl - create a new Worksheet, change sheet property in Python”, I introduced how to create a new Worksheet and change Worksheet properties.
In this article I show how to read and write Cell in Excel with Python.
Enter values to Cell
Worksheet object has a position of Cell as property. That is dictionary type and consists of row and column number.
Using them, access to Cell and edit the values. A sample code is as below.
 1from openpyxl import Workbook
 2from openpyxl.compat import range
 3from openpyxl.utils import get_column_letter
 4
 5wb = Workbook()
 6ws = wb.active
 7
 8# Enter `hogehogehoge` in column of `B` and row of `2`
 9ws['B2'] = 'hogehogehoge'
10# Enter `fugafugaufga` in column of `F` and row of `5`
11ws['F5'] = 'fugafugaufga'
12
13wb.save(filename = 'sample_book.xlsx')
Or, using cell function can do the same. However, cell function must be given arguments column number and line number.
1ws.cell(row=2, column=2, value='hogehogehoge')
2ws.cell(row=5, column=6, value='fugafugaufga')
Read values in Cell
To read values in Cell, access to value property in Cell object.
1b2 = ws['B2'].valueOr, using cell function can do the same when reading.
1b2 = ws.cell(column=2, row=2).valueProcessing for each row
The iter_rows function can get instances for each row.
For specifying to range of extracting data, min_row, max_row, min_col and max_col options exist.
In addition, if max_row or max_col options are not given in arguments, it is the processing target up to the position where the data is entered.
Actually, it’s rarely to read datas from column A of the first row when handling files.
In the following example, processing in units of one line with the second line as the starting line.
1for row in ws.iter_rows(min_row=2):
2    for cell in row:
3        print(f"col {cell.col_idx}:{cell.value}")
4    print('------------------------------------------')
The output result is as follows.
 1col 1:None
 2col 2:hogehogehoge
 3col 3:None
 4col 4:None
 5col 5:None
 6col 6:None
 7------------------------------------------
 8col 1:None
 9col 2:None
10col 3:None
11col 4:None
12col 5:None
13col 6:None
14------------------------------------------
15col 1:None
16col 2:None
17col 3:None
18col 4:None
19col 5:None
20col 6:None
21------------------------------------------
22col 1:None
23col 2:None
24col 3:None
25col 4:None
26col 5:None
27col 6:fugafugaufga
28------------------------------------------
Processing for each column
The iter_cols function can get instances for each column.
Usage is similar to iter_rows function.
In the following example, processing in units of one column with the second column as the starting column.
1for col in ws.iter_cols(min_row=2):
2    for cell in col:
3        print(f"row {cell.row}:{cell.value}")
4    print('------------------------------------------')
The output result is as follows.
 1row 2:None
 2row 3:None
 3row 4:None
 4row 5:None
 5------------------------------------------
 6row 2:hogehogehoge
 7row 3:None
 8row 4:None
 9row 5:None
10------------------------------------------
11row 2:None
12row 3:None
13row 4:None
14row 5:None
15------------------------------------------
16row 2:None
17row 3:None
18row 4:None
19row 5:None
20------------------------------------------
21row 2:None
22row 3:None
23row 4:None
24row 5:None
25------------------------------------------
26row 2:None
27row 3:None
28row 4:None
29row 5:fugafugaufga
30------------------------------------------
Enter values for a row
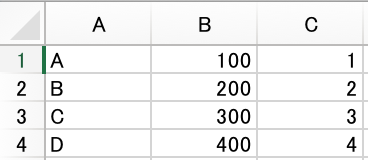
The append function in Worksheet instance can enter data for one row.
By giving list type data as an argument, data goes into the sheet left-aligned.
 1wb = Workbook()
 2ws = wb.active
 3
 4data = [
 5        ['A', 100, 1.0],
 6        ['B', 200, 2.0],
 7        ['C', 300, 3.0],
 8        ['D', 400, 4.0],
 9]
10
11for row in data:
12    ws.append(row)
13
14wb.save(filename = 'sample_book.xlsx')
Conclusion
It is available to
- Enter or read values to
CellwithCellinstance property orcellfunction - Process data row by row or colum
- Enter a value for a row with
appendfunction

